

Hello dear readers of my site uzinfobiz.ru. I am with you Ohunjan. Today we will learn how to make a flash banner. We will learn this from Asadbek Asgaraliyev, a regular reader of my website. If you follow what Asadbek wrote here, you will definitely learn how to make a good banner.
I myself made the following banner following the steps shown in this article, but I really liked it, it’s very easy to make a banner, I’ve never made a banner before. I have only posted a photo of the banner here, and the banner itself will be released in a few days in a video course on creating a site in WordPress, then I will post it on the sidebar of my site. Here’s a picture of that banner, which is definitely a draft banner:
By the way, one more thing, I’m giving away my video course on creating a site in WordPress for free to the first 10 readers who leave 10 comments on the articles on my site. Such words. Now I will give the floor to Asadbek, thank you Asadbek, the floor is yours.
- What is a banner ad? Why do you need a banner?
- What software is needed to create a banner?
- Now let’s go to the “Background” section together.
- Now let’s go to the “Effect” section together.
- Now let’s go to the “Text, isobr., SWF” section together.
- Now let’s go to the “Web link” section.
- This is in the “Public banner” section.
What is a banner ad? Why do you need a banner?
Greetings to all! We know that nowadays the number of websites has increased. There is a lot of information on these websites. Let’s imagine that a new site has been opened on the Internet. Many people do not know about him! This should be made public. The most effective way to do this is ADVERTISING. On the Internet, sites make money by advertising each other. The most effective way to advertise is to use a banner that has a beautiful effect and takes up little space. For banners, SWF file is the best. I will have to write a separate article if I talk about advertising.
Keeling together, we will now start learning how to create a banner.
What software is needed to create a banner?
First of all, we need Aleo Flash Intro Banner Maker v4.0 (FREE DOWNLOAD). Installing the program is very simple, after downloading it, all you have to do is answer the installation questions. Just press the “Dalee” button. This is not a difficult task!
After the program is installed, the following icon will appear on the desktop.
This program is accessed like any other program.
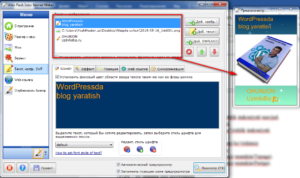
The program interface looks like this.
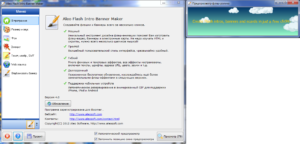
The settings of the banner being created are adjusted using the interface on the left side of the interface. The interface on the right is the banner view. Now let’s get acquainted with the size and volume section together.
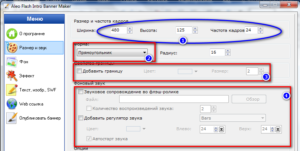
(1)>> The dimensions of the banner are entered and the number of frames in 1 second is entered. The higher the number of frames, the higher the quality, but the larger the size. And the site that advertises is sure to resist placing a large banner! A large banner makes the site load more difficult.
(2)>> The appearance form of the banner is determined. Form means its appearance. Here there are forms such as Square, Alyana, Square without corners.
(3)>> Here, after entering the shape of our banner, you can add color to its edge. If we set the flag, the options for entering its color and color thickness will be activated.
(4)>> Here you can add a song for the banner. After the flag is set, the rest of the menus are activated.
Let’s create a banner together so that it will be easier for us to learn. Let’s imagine that we want to put Ohunjon’s book “Creating a blog in WordPress” for advertising on a site.
For this, first of all, the dimensions of the banner are entered.

We choose 220 x 320 dimensions for our banner. You choose the size you want for your banner. Of course, ask the owner of the site where you want to advertise. Because it tells the dimensions of the place to put advertising banners.
(1) Banner dimensions have been introduced. I chose a size of 220×320 for the banner.
(2) Banner quality is included. I recommend trying the program to find out how much the quality changes. I chose the default state.
We have nothing left to do in this section.
Now let’s go to the “Background” section together.
In this section, you can set colors and images for the background of the banner. So let’s fix the background.
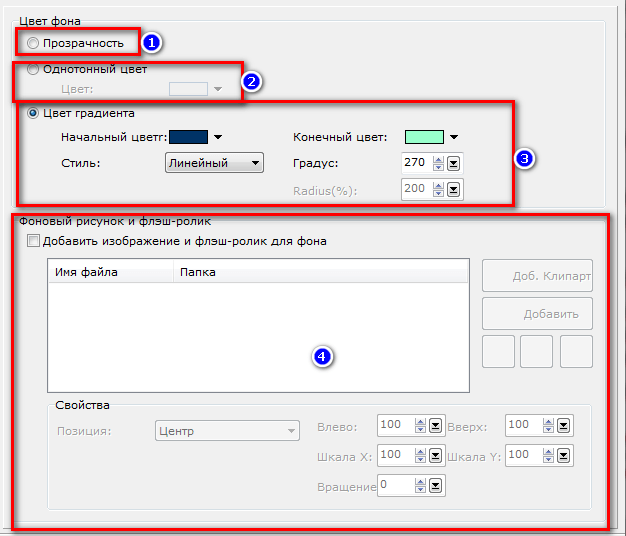
In this section, you can execute the commands shown in the image above. I wrote about them in full below.
(1) Nothing is set for the background, which means the background will remain white.
(2) 1 type of color is set for the background. For example, if you put red color, only red color will be the background for the whole banner.
(3) In this part, 2 types of colors were selected for the background. With settings you give styles for 2t a color.
(4) In this part, you will be able to put a picture for the background of the banner. At the same time, you can make settings about the size of the image and its appearance. When placing an image, place a small image so that the banner will be easy to open.
I create now there will be standard colors for the horizontal banner. You can easily change yours if you want.
Now let’s go to the “Effect” section together.
In this section we can set effects for the banner!
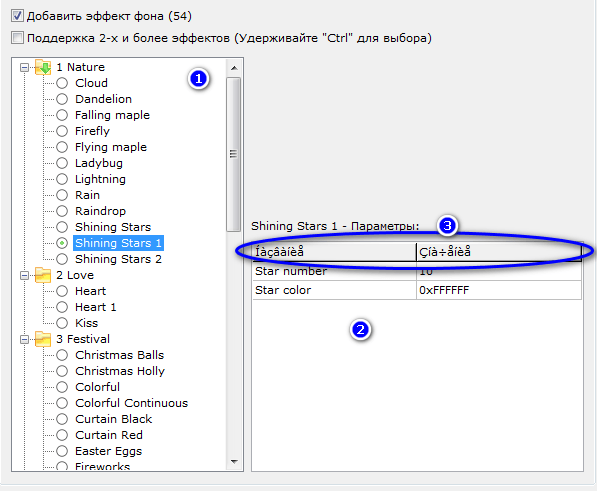
(1) Here you can get effects for yourself. This effent is visible in the background. Our default effect is Clouds.
(2) These effects settings need to be changed. By default, if there is a cloud, for example, you can enter its number and size. Depending on the type of effect, its settings will change.
(3) It may be asked why this part is given inexplicably. That’s why I want to teach you. The word fonts here are not installed on my computer. Therefore, incomprehensible codes are given. You must have fonts installed for this to work.
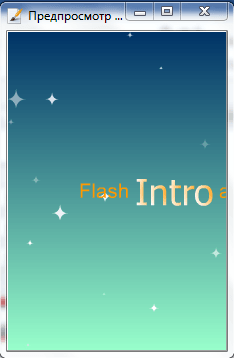
For the banner I’m creating, I’ve chosen the Shining Stars 1 effect, which is the type of effect where the stars are visible. The banner has the following appearance.
Now let’s go to the “Text, isobr., SWF” section together.
And here are the commands shown in the picture.
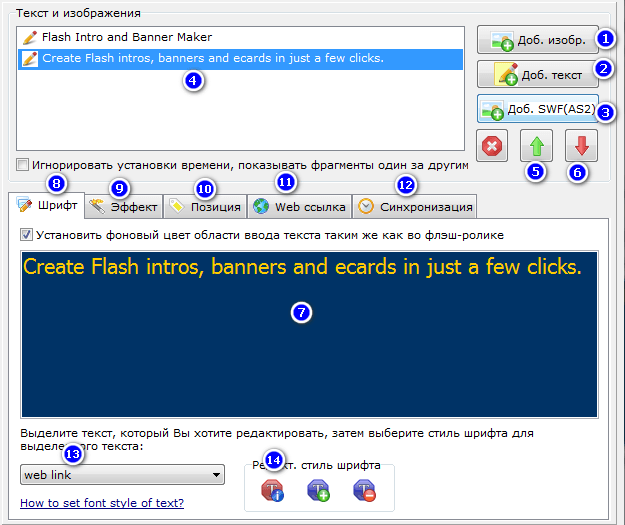
(1) An image from the computer memory is placed for the banner. When this button is pressed, the memory of the computer will be displayed. You are required to upload the images of your choice from your computer’s memory.
(2) There is an option to put text for the banner. When this button is pressed, a special interface for writing text will open. You write texts there and press the OK button. Then your text will appear in the banner.
(3) It is possible to insert a SWF file from the computer memory for the banner. This works like inserting an image, except that you specify a file in *.swf format.
(4) In this section, we can see the files added for the banner (such as images, texts, SWF files). Let’s call “Images, texts, SWF files” as “files” from now on. OK!
(5) Using this button, we can change the position of our files (Up).
(6) Using this button, we can change the position of our files (Down).
(7) The posted texts will be edited from here.
(8) This is the title of the 7th section.
(9) The effect is set through this section. To do this, you select a file from section 4 and you select an effect, and the effect will be installed on the file you specified.
(10) From here, we determine the position of the fillets you have placed. For example, when you write text, its place is moved to the top. You should put it down. This section will help you with that. Its coordinates can be moved using the method of increasing and decreasing.
(11) From here, it will be written which site will be entered when the file (picture, text) displayed in the banner is clicked with the mouse. I would recommend that you post a link for the general banner. I will teach you how to put a general link during the lessons. Continue reading the article. OK!
(12) With this section, we will be able to specify how long our uploaded files will appear and how long they will be displayed on the banner. We will show you how many seconds our file will appear in the banner after we set it in the “Time for autobrazheniya texta (Sekundy)” section. If we set it to “0”, the file will be displayed in the banner immediately. In this section “Vremya do autobrazheniya texta vo flash-rolike (Seconds)” we specify how many seconds our file will be displayed. If we set it to 0, the file will appear and disappear.
(13) Enter what the input text is, here it is a web link in the default state.
(14) You can make settings for the font. You can add a new style, delete a style, and install a previously saved style.
I made some settings and created a banner as follows. For this purpose, I added pictures and texts here. I applied an effect to the text and image from the effect section.
Now let’s go to the “Web link” section.
From there, when our banner is clicked, it will be shown to which site or page to enter. That is, you enter the name of the site that will be accessed when the general banner is clicked. I enter http://UzInfoBiz.ru. You can easily enter your site.
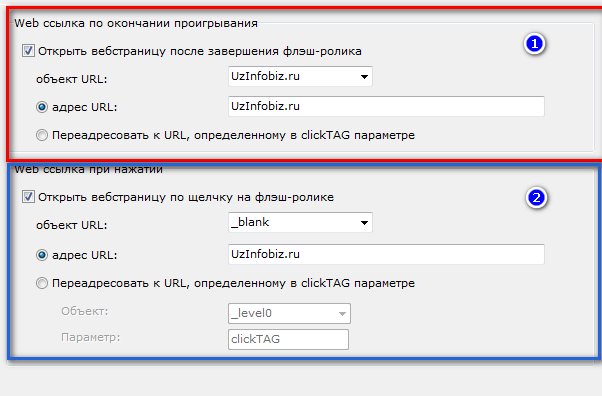
(1) When the mouse is clicked in this section, the flash banner will enter the entered site after completion. Do not use this part. The site owner may not like this.
(2) When the mouse is clicked on this part, it is immediately entered into the site.
We created the banner to create. Now we need to save this banner. Let’s go to the last section to save.
This is in the “Public banner” section.
You can do the following in this section.
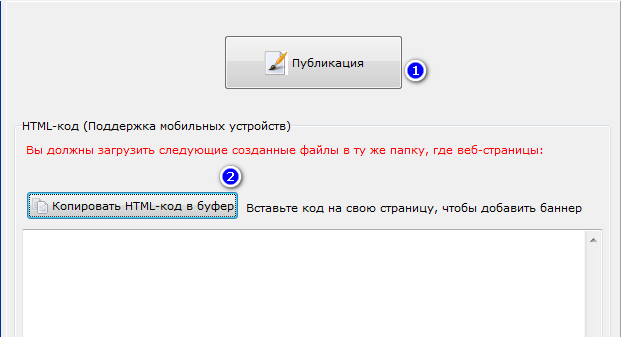
(1) With this button we save the banner to our computer.
(2)With this section, we can get its HTML code.
1-When we press the button, the following settings will appear.
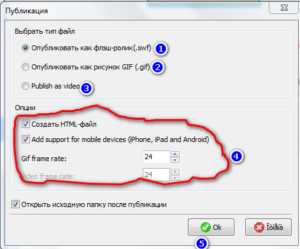
(1) Save in SWF format (Recommended) (Small size)
(2) Saving in GIF format (Not recommended.) (Large size)
(3) Save in video format (Not recommended.) (Large size)
(4) Section about getting the HTML code of the file being created, see “Sozdat HTML-file”. We may not receive HTML files due to flagging.
(5) If we press the OK button, we can save the banner to our computer memory.
You can put this banner on your desired site. I mean, it doesn’t matter whether the site was created in WordPress or Joomla. It can also be placed on a site created in HTML. By default it provides you with HTML codes. You extract the *.swf file from your saved directory and give it to the author of your site on which you want to advertise.
To read such useful articles, just spend 10 minutes of your time a day to enter UzInfoBiz.ru. You don’t lose anything, you just get new knowledge for free. I would like to express my gratitude to Mr. Ohunjon, who organized such a good work, and Mr. Umidjon, the editor of the site.
“THANK YOU SO MUCH, BROTHER AHUNJON. YOU ARE ONE OF MY BEST TEACHERS ON THE INTERNET!!!”
I will not say goodbye to you. See you in the next articles. See you later…
Thank you Asadbek. Friends, I think you got the answer to your question about how to make a banner. Leave in the comments what you don’t understand, we will surely answer together with Asadbek. See you in the next articles!


 haqida asosiy tushunchalar!")
